Thursday, November 22, 2012

White Chocolate Blackberry Cheesecake


Happy Thanksgiving! We are going to my in-law's house for Thanksgiving dinner so I have narrowly escaped making Thanksgiving for another year. In fact, all we are doing is bringing a cheese ball and some crackers so I don't have to cook today AT ALL. That is definitely something I am thankful for.

This is a cheesecake that I made a while ago when we found some blackberries on a great sale. It was absolutely divine - one of the best cheesecakes that I have ever had.

Crust:
1 1/2 cup graham crackers, crumbled
1/3 cup margarine, melted
1/4 cup sugar

Filling:
4 8 oz packages cream cheese
1/2 cup seedless blackberry preserves
1/4 cup water
1/2 cup sour cream
1 1/4 cup sugar
2 tsp vanilla extract
5 eggs
4 oz white chocolate chips or chunks

Preheat oven to 475°. Place a large pan filled with about 1/2" water into the oven while it preheats. In a small bowl, combine blackberry preserves and water. Heat in a microwave for about a minute and stir until smooth. Set aside. Make crust by combining graham crackers, margarine, and sugar. Press crust into the bottom and about halfway up the sides of a 10" spring form pan that has been lined with parchment paper.

Use an electric mixer to whip the cream cheese. Then add sugar, sour cream, and vanilla and continue mixing. Beat in eggs one at a time. Don't over-mix.

Sprinkle white chocolate over the crust, then spoon half of the cheesecake filling over the chocolate. Drizzle half of the blackberry preserves over the cheesecake and swirl with a knife. Pour remaining cheesecake filling and drizzle remaining preserves over top. Swirl enough so that there is a pretty design. 

Place cheesecake in oven and bake for 12 minutes at 475° then turn oven down to 350° and bake for another 50-60 minutes. Then, turn oven off and let the cheesecake cool for at least an hour in the oven. This helps to prevent cracking. Chill cake for at least 4 hours before serving. Top with powdered sugar, blackberries, whipped cream, and/or white chocolate shavings.


Wednesday, November 21, 2012

Stuffed Red Peppers


This recipe is almost exactly the same as Paula Deen's recipe for Stuffed Red Peppers. Her recipe got 5 stars, according to the Food Network. When I sat down to eat this, I think I was expecting something a little bit more spectacular - especially because it got such great reviews. I would probably give it a 4 or 4.5. 

Preparation time: 30-45 minutes (active prep) 45-50 minutes (bake time)
Serves: 2-3 people

3 red bell peppers (depending on size)
1/2 lb ground beef
1/2 lb ground pork
1 medium onion, chopped
2 tsp minced garlic
2 tsp beef bouillon granules
salt and pepper to taste
3/4 cup cooked rice
1/3 cup salsa
1/4 cup nacho cheese
1/4 cup sour cream
1/4 cup green onions, chopped
2 tsp soy sauce
3/4 cup hot water

Prepare the peppers by cutting them in half, cleaning them, and removing the seeds and ribs. Do not remove the green stems.

Preheat a skillet over medium high heat. Saute beef, pork, onion, garlic, and 1 tsp beef bouillon until meat is fully cooked and onion is soft. Stir in the rice, salsa, cheese, sour cream, green onions, and soy sauce. Season with salt and pepper. Use this filling to stuff the peppers.

Mix 1 tsp beef bouillon with hot water and pour into a medium casserole dish. Place stuffed peppers into this dish and cover with foil. Bake at 350° for about 30 minutes. Then remove the foil and spoon the juice over the peppers. Continue baking for another 15 minutes.


Tuesday, November 20, 2012

Zuppa Toscana


When I lived in Honduras, people ate soup frequently throughout the year - even though it was always very hot outside. Whenever anyone served us soup, they would usually make a joke about who was going to start sweating first. Here in the states, soup is more of a fall or winter dish. I guess sweating just isn't as well-accepted as part of everyday life.

Anyway, my brother and sister-in-law eat soup a lot. This is one of the recipes that they sent when I asked them for some of their best recipes. We also enjoyed it quite a bit.

Preparation Time: 20 minutes
Cooking Time: 4-6 hours
Serves: 6 people

5 cups chicken broth 
2 cups whipping cream (I prefer evaporated milk)
1/2 - 1 tsp red pepper flakes
salt and pepper to taste
1 small onion, diced
1/2 lb bacon, cooked and crumbled
4 to 5 cups chopped kale or spinach
3 to 4 potatoes, washed and cut into small chunks
1 lb mild Italian ground sausage

Cook bacon, cool and crumble into small pieces. Chop vegetables. Place everything in a slow cooker and cook on low for 6-8 hours.


Monday, November 19, 2012

Mozzarella Sticks


I love mozzarella sticks. I have been planning to make them for a few months now and I finally got around to doing it. This recipe is adapted from the Food Network and it turned out great. We made so many of them that we had to freeze most of them. Recently, my husband pulled some out of the freezer and fried them again (he has this weird love of freshly fried food) and he thought they were even better the second time.

2 lb mozzarella cheese, cut into sticks that are about 4" long and 1/2" wide
1 1/2 cups Italian style Panko bread crumbs
1 cup fresh Parmesan, grated
1 tsp salt
4 eggs
Canola oil for frying

Cut cheese into slices. In a medium bowl, combine bread crumbs, 1 cup Parmesan, and salt. In another bowl  beat eggs. Dip cheese in egg and then coat with the bread crumb mixture. Place cheese sticks on a baking sheet and cover. Place them in the freezer for at least 2 hours before frying.

When it is time to fry the mozzarella sticks, preheat the oil over medium heat. Fry the sticks in batches until they are golden brown. Serve warm with marinara or ranch dipping sauce.


Monday, November 12, 2012

Asian Meatballs


Well, it seems like that new blog I started has kind of taken over my life. I have spent a lot of time during the last two months working on cards for the Mutton Hollow Country Barn Boutique. I made over 200 cards. Unfortunately, only about 7 of them actually sold. Needless to say, I don't think I will be doing that craft show again. So now I am back to spending my time cooking and blogging about it. I have actually missed writing about my recipes. I actually made several really good ones while I was on hiatus. I will be posting those over the next several weeks, until I have to take another break to move into our new house.

Anyway, I found these meatballs on For the Love of Cooking. They tasted great. I also really liked the tangy dipping sauce that went with them.

Meatballs:

1 lb ground turkey
1/4 cup cilantro, chopped
2 Tbsp green onions, finely chopped
1 Tbsp ginger, minced
1 tsp minced garlic
1/4 cup panko bread crumbs
1 Tbsp reduced sodium soy sauce
2 tsp sesame oil
salt and pepper, to taste


Dipping Sauce:

4 Tbsp soy sauce
2 Tbsp lime juice (approximately 1 fresh lime, juiced)
2 Tbsp water
2 tsp sesame oil
1 Tbsp green onion, finely chopped
1/4 tsp honey

Preheat oven to 500° For meatballs, combine all ingredients. Gently mix until combined. Form meatballs using approximately 1/4 cup mixture per meatball. Place on a baking sheet and bake until they are cooked completely, about 15 minutes. 

While meatballs are cooking, combine ingredients for dipping sauce and whisk until they are combined. 

Serve meatballs and dipping sauce immediately. The meatballs and dipping sauce also taste great when served over rice.

Wednesday, August 15, 2012

Chicken Stuffed with Ricotta and Bacon


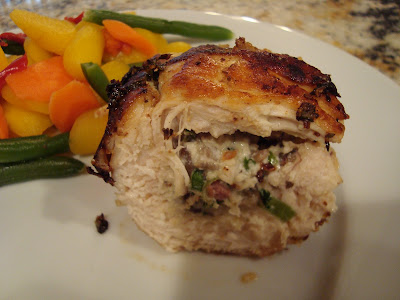
This was one of the best meals that my husband and I have had in a long time. For months now, I have been wanting to try some sort of stuffed chicken breasts. There are tons of different recipes out there, but I always imagined that the preparation would be so difficult and time consuming that I wouldn't be able to handle it, especially with a baby that wants to be held constantly. I finally decided to do it and it actually wasn't too bad! I felt like it went pretty well - definitely worth the extra time. The only thing I would change next time is that, rather than trying to pound out the huge chicken breasts that I had, I would first slice them in half (like a hamburger bun) so they were already pretty thin, then pound them out. Even after pounding for quite a while, I feel like I still didn't pound my chicken thin enough.

Prep time: about 1 hour

Serves: 4

2 large chicken breasts, sliced in half and pounded out
2 slices bacon, cooked and cut into small pieces
1 tsp olive oil
1 small onion, chopped
2 green onions, chopped
2 cloves of garlic, minced
1/2 cup ricotta cheese
1/8 cup Parmesan cheese, shredded
1/4 cup spinach, chopped
1/2 tsp oregano
1/2 tsp basil
1 Tbsp fresh parsley, chopped
Salt and freshly ground pepper, to taste
1 Tbsp olive oil

Prepare chicken breasts so that they are thin (about 1/4"). Then, in a medium skillet, cook the bacon. Drain bacon grease from skillet and add tsp olive oil. Saute onion, green onions, and garlic until onion becomes translucent. Remove from skillet and allow mixture to cool.

In a separate bowl, combine bacon, ricotta, Parmesan, spinach, oregano, basil, and parsley. Stir in onion mixture and season with salt and pepper.

Spoon prepared mixture onto the center of chicken breasts. Roll them up and secure them with toothpicks. Add 1 Tbsp olive oil to the skillet that you used for the bacon and onions mixture. When it has preheated, place the chicken rolls, seam side down, in the pan and cook for 5-6 minutes. Continue to cook, carefully rolling the chicken breasts so all sides are golden brown and fully cooked, another 10 minutes approximately. 

When the chicken is fully cooked, allow it to rest for about 5 minutes, and then slice and serve.

Monday, August 13, 2012

My New Blog

I just started a new crafting blog called Little Card Corner. I mostly do card making, but I occasionally dabble in other craft projects as well. Within that blog, I am also doing two series: Card Making Basics (Tuesdays), and Crafting on a Budget (Thursdays). In these posts, I share helpful tips and information that I have picked up over time.

If you are already an avid crafter or are looking for a new hobby, stop by my blog! Here is an example of a Father's Day card that I made this year:


Saturday, August 11, 2012

Shredded Pork Burritos


When I first got my Crock Pot, I didn't use it very often because I felt like a lot of the slow cooker recipes were pretty much the same. Over time, I have found a lot more ways that I can use mine, which have allowed me to use it a lot more often. I actually have two slow cookers now: a small one and a large one. One of the biggest advantages to using a Crock Pot during the summer is that it allows me to slow cook meat so that it is nice and tender, without having the kitchen heat up along with the oven. I make a lot of my most delicious and easiest Mexican-style recipes with meat that I cooked in my slow cooker.

1 1/2 lb pork roast
1/2 cup chicken broth
1/2 medium yellow onion, chopped
2 tsp cumin
1/2 tsp chili powder
1 tsp oregano
1 tsp onion powder
1/2 tsp paprika
2-3 cloves garlic, minced
1/4 cup cilantro, chopped
1 Tbsp fresh lime juice
Salt and freshly cracked pepper, to taste

Place roast, chicken broth, onion, cilantro, and spices in a slow cooker. Cook on low for 6-8 hours or on high for 3-4 hours. Shred meat with two forks. 

Other great recipes for these burritos are:
Pico de gallo


Friday, August 10, 2012

Cilantro Lime Rice


Another great component of the burritos we had recently (the meat recipe is coming up soon!), this rice had a great flavor. Historically, I have usually made plain white rice without adding any seasonings other than salt. Lately, I am really liking the idea of seasoning rice so that it complements the flavor of the other parts of the meal. I made these few last minute additions to the rice and I was really pleased with the results.

1 cup white rice
2 cups water
1/4 cup cilantro, chopped
juice from 1-2 limes (approximately 2 Tbsp)
1 tsp salt

In a medium saucepan, boil water, rice and salt for approximately 20 minutes or until the water is completely absorbed and the rice is soft. Stir in lime and cilantro just before serving rice.


Thursday, August 9, 2012

Black Beans


I use black beans a lot in burritos, tacos, nachos and other things. Of course I like them best when they are freshly boiled, but lately I have eaten a lot that were canned. I often heat them up and add a few spices, but this time I decided to add a few more things for a little bit of extra flavor. I thought they turned out great - perfect for the burritos that we used them for. I may just use this as my "go to" black bean recipe in the future.

1 Tbsp canola oil
1 can black beans, rinsed
1/2 can (about 3/4 cup) diced tomatoes, rinsed
1/2 medium yellow onion, finely chopped
1 clove garlic, minced
1 tsp cumin
1/2 tsp chili powder
1/2 tsp oregano
salt and freshly cracked pepper, to taste

Preheat oil in a small saucepan over medium heat. When the oil glistens, add onion and cook, stirring, until it begins to be transparent. Then add remaining spices and ingredients. Cook, stirring occasionally, for 8-10 minutes or until everything is thoroughly heated. The longer you cook it, the more the flavors will combine.

Wednesday, August 8, 2012

Blackberry Nectarine Smoothie


My husband and I are still pretty stoked about our new Ninja blender. All of our friends seem to be on kind of a health kick while we, on the other hand, seem to be eating more and more desserts. (It doesn't help that people keep bringing us treats. How can we possibly say no to such delicious gifts?) We do want to start to be a little bit more healthy, though, so we made this smoothie as kind of a healthy dessert a few nights ago.

When I make smoothies, I like to use some fresh fruit and some frozen fruit, rather than using a lot of ice. It seems to make a thicker smoothie, which I like.

Prep time: 5 minutes

Serves: 2

2 cups frozen blackberries
2 fresh nectarines
3/4 cup plain low-fat yogurt
1/8 cup sugar (or to taste)
1/2 cup orange juice (more or less for desired thickness)

Blend all ingredients until smooth. Enjoy!

Tuesday, August 7, 2012

Mango Lassi


A few weeks ago, I was taking with a friend of mine about how much I love Indian food. She told me that she orders a Mango Lassi every time that she goes to an Indian restaurant. After she said that, I was dying to try one. I went to Bombay House and loved the one that they had there, so I decided to figure out how to make one at home. Of course it was even better because I got to use my Ninja blender! This recipe isn't quite as sweet as the one I had at the restaurant because that is the way I like it. You could add more sugar if you prefer.

Prep time: 5 minutes

Serves: 2 people

2 mangos
1 3/4 cup plain (or greek) yogurt
1/2 cup (a little less) sugar
1 cup ice

Combine everything in the blender and blend until smooth. Enjoy!

Monday, August 6, 2012

Roasted Tomato and Olive Bruschetta


This is the first recipe that I used with my Ninja Blender. It was one that I found in the owner's guide that came in the box, but made a few of my own alterations (mostly because I didn't have fresh tomatoes). This was a quick and easy appetizer and we liked it a lot. I will definitely use this recipe when I have guests over. This recipe was the first time that I got really excited about my new blender. It was great! Afterwards, I searched "ninja blender recipes" online and realized that there are hundreds of recipes that I can try. What a great cooking tool!

Prep time: 1 hour (including baking time)
Serves: 6 (depends on desired serving)

1 can of stewed tomatoes, drained and rinsed
1 Tbsp olive oil
salt and pepper, to taste
1 clove garlic
1/4 cup black olives
1/2 tsp dried basil
1 loaf Baguette, sliced and toasted

In a medium bowl, toss tomatoes with olive oil and desired amount of salt and pepper. Place the tomatoes on a baking sheet and bake at 350° for 30-40 minutes. Remove from oven and cool slightly.

Add tomatoes, garlic, olives, and basil to the blender. Pulse for a few seconds, or until vegetables are roughly chopped. Serve warm or cold over baguette slices.


Friday, August 3, 2012

Ninja Blender


For my birthday, I asked for a really nice blender. I hadn't ever done any research on blenders before, but the cheap one that we got for our wedding had a crack in the base and I was sick of the smell of the burning motor every time I tried to use it. 

So my husband did a lot of research and found the Ninja Kitchen System 1100 Blender And Food Processor (Google Affiliate Ad). It is a great blender that is much more affordable than other professional quality blenders. One thing I really like about it is that the bottom is flat and the blade is easily removable so that it is easy to clean and the blended food doesn't get stuck in the bottom, like it did with my old blender. 

This blender comes with two pitchers. I have only used the small pitcher so far because there are only two of us and I don't need the entire capacity of the large blender. I have already used it for lots of different recipes, some of which I will be posting this coming week. I have used it to crush ice, chop vegetables, make cookie dough, and make smoothies and I haven't been disappointed yet!

Click on the label in the side bar of this blog for some of the recipes that I have tried with my Ninja blender.


Thursday, August 2, 2012

Carne Asada Tacos


My husband had an extremely busy week on the week of my birthday. I know that he wanted to make my birthday special, and would insist on making me dinner even though he was working 12 hours a day so I chose something that would be quick and easy and that wouldn't have too much clean up. I found this amazing Carne Asada recipe and knew it had to be my birthday dinner. I put the marinade together the night before so all my husband had to do was grill the meat on his barbecue (one of his favorite activities). We worked together to make pico de gallo and guacamole and had the dinner ready in no time at all.

Prep time: 10-20 minutes (and marinate over night)

Serves: 4 people

1 1/2 lb flank steak
1 tsp cumin
1/2 tsp black pepper
2 tsp salt
1 tsp garlic powder
1 tsp paprika
2 tsp cumin
1 tsp onion powder
1 tsp chili powder
2 tsp oregano
5 cloves garlic, minced
1/8 cup lime juice (or juice of two limes)
1/2 cup reduced sodium soy sauce
1/2 cup olive oil
1/3 cup vinegar

Combine all ingredients in a Ziplock bag, mixing thoroughly before adding flank steak. Marinate for between 6 and 24 hours.

Over a preheated barbecue, grill until the meat reaches your desired level of doneness. Remember that the meat will keep cooking for a few minutes after you have removed it from the heat. Let the meat rest for several minutes before slicing across the grain.

Serve over corn tortillas with pico de gallo, guacamole, and hot sauce.


Wednesday, August 1, 2012

Coconut Rice


This rice has just the right amount of coconut flavor. Enough that you can taste it, but not so much that it is overpowering. It was the perfect complement to the Mandarin Orange Chicken that I posted a few days ago.

1 cup white rice
1 14 oz can light coconut milk
3 Tbsp water
1/2 tsp salt
1/8 cup coconut

Combine rice, coconut milk, water, and salt in a medium sized saucepan over medium heat. When it comes to a full boil, reduce to medium-low and cook for approximately 20 minutes or until the liquid has completely absorbed and the rice is soft. Stir in the coconut and serve hot.

Tuesday, July 31, 2012

Teriyaki Meatball Lettuce Wraps


I don't often use or buy pre-prepared foods. They usually don't taste as good as things that are homemade, but there are some days when I just don't have time to cook. And days that I just don't want to. So I usually have a few easy meals in my freezer that I can pull out and have on the table in just a few minutes. These Aidells Chicken Teriyaki Meatballs are one of those things. I tasted them for the first time at Costco about a month ago and I was instantly converted. Costco has some of the best pre-prepared food available and these meatballs were so amazing that I couldn't help but share this "recipe." Here is a link the original recipe.

Here is a picture of the meatball package:

Prep time: 15 minutes

Serves: 2-3 people

1/2 Tbsp toasted sesame oil
1/2 lb Aidells teriyaki meatballs
2 carrots, cut into small pieces
2 green onions, thinly sliced
hoisin sauce, to taste
2 Tbsp fresh cilantro, chopped
Romaine or green leaf lettuce, rinsed

Preheat oil in a medium skillet over medium heat. Cut meatballs in half and saute until brown and heated completely. Add carrots and green onions and continue to cook for another 2-3 minutes. 

To serve, place meatball mixture into center of lettuce leaves. Sprinkle with cilantro and drizzle desired amount of hoisin sauce over top. Enjoy!

Monday, July 30, 2012

Mandarin Orange Chicken


Another successful Asian recipe! I think I might finally be getting the hang of this Asian stir fry thing! This recipe came from motherthyme.com, a site that I plan to visit frequently now that I have discovered it. Plus, she is really good at photography. The amazing picture definitely helped convince me to make this recipe. The only thing I added to the recipe was more vegetables. I love cooking with fresh veggies! Part of what made it taste so good was that I served it over Coconut Rice, which I will be posting later this week.

Prep time: 30 minutes

Serves: 4 people

1 pound boneless skinless chicken breast, cut into bite sized pieces
2 Tbsp prepared orange juice
1/4 cup plus 1 Tbsp corn starch
2 Tbsp canola oil
1 red pepper, sliced
1 yellow pepper, sliced
1 medium sweet onion, sliced
1/2 cup sugar snap peas
1/2 cup broccoli
2 cloves garlic, minced
2 Tbsp low sodium soy sauce
2 Tbsp hoisin sauce
1 can mandarin oranges with juice
3 Tbsp vinegar
3 Tbsp brown sugar
Salt and freshly ground pepper, to taste

Place chicken pieces in a medium bowl. Add orange juice, 1/4 cup corn starch, salt and pepper and mix until the chicken is evenly coated.

In a medium skillet, preheat oil over medium heat. When oil begins to glisten, add chicken and stir fry until it is golden brown on all sides. Then add vegetables to skillet and cook until they are tender. Mix soy sauce, hoisin sauce, and remaining corn starch. Add sauce mixture, mandarin oranges with juice, vinegar, and sugar to skillet. Continue to cook, stirring constantly for another 3 minutes. Season again with salt and pepper to taste.

Sunday, July 29, 2012

Zucchini Tomato Casserole


I bought some zucchini on a great sale the other day and wanted to find a great recipe to showcase it. I found this one on allrecipes.com. After reading the reviews, I decided to make it - with a few of my own alterations, of course. There were a couple of people who reviewed the recipe and said that it tasted like pizza. I really like pizza so I was excited to see if it was true, and it kind of was - if you usually make crustless pizza with no meat and no sauce... and only top it with fresh zucchini and tomatoes. Okay, so it tasted nothing like pizza. But I loved it anyway. Even though we ate it as a main dish, I think it is meant to be a side.

Prep time (including baking): 1 hour 20 minutes

Serves: 4-6 people

1/3 cup fresh Parmesan cheese, grated
1 1/2 cups mozzarella cheese, grated
1 tsp dried oregano
1 tsp fresh basil
2 cloves garlic, minced
salt and freshly ground pepper, to taste
4 medium tomatoes, thinly sliced
2 medium zucchinis, thinly sliced
1/4 cup onion, thinly sliced
3 Tbsp butter
2/3 cup Italian bread crumbs

In a bowl, combine mozzarella, Paremsan, oregano, basil, garlic, salt and pepper. Lightly coat a 9x9" pan with cooking spray. Layer 1/2 of the zucchini, 1/4 of the cheese mixture, 1/2 of the tomatoes, 1/4 of the cheese mixture. Repeat the layers. 

In a medium skillet, melt the butter over medium heat. Saute onion in melted butter for 3-4 minutes. When the onion begins to soften and become translucent, stir in the bread crumbs. Spread mixture over top of the casserole. 

Cover with foil and bake at 375° for 25 minutes. Then, remove the foil and bake for another 15-20 minutes or until the top begins to brown.


Saturday, July 28, 2012

Chicken & Broccoli Stromboli


We eat some type of pizza in our house almost every week, so I am always looking for new and interesting combinations of toppings just so we can mix it up a little. For this meal, I used my regular pizza dough recipe, but cut it in half. We really enjoyed this stromboli. It was fun to eat and was even a little bit (dare I say) healthy.

I seasoned the chicken using Chef Todd's Pit Seasoning. It is a great blend of spices that I use all the time. If you don't have this seasoning mix, you can use a combination of garlic, Italian seasoning, salt and pepper. It won't be exactly the same, but that is what I used to do before I discovered my new favorite seasoning.

3/4 lb chicken, cut into small pieces
2 tsp olive oil
1/2 of a medium onion, finely chopped
Chef Todd's Pit Seasoning, to taste
1 red pepper, chopped
1 tomato, chopped
fresh broccoli florets
fresh spinach leaves
mozzarella cheese
Alfredo sauce for dipping

Prepare the pizza dough. While it is raising, preheat oil in a medium skillet over medium-high heat. When the oil glistens, add onion and saute for 4-5 minutes or until it starts to become transparent. Then add chicken and seasoning and cook until the chicken is done.

Roll out pizza dough (between 1/8" and 1/4" thickness) in a rectangle about 18" long and 11" wide. Layer spinach, chicken and onions, red pepper, tomato, broccoli, and then mozzarella cheese down the center of the dough. Fold each side of dough over and pinch to close. Bake on 400° for 15-18 minutes or until golden brown. Remove from oven and spread a small amount of butter over the surface of the crust to add flavor and maintain moisture. Cut into pieces and serve with Alfredo sauce or marinara sauce.


Friday, July 27, 2012

Four Layer Pistachio Dessert


I have been promising some of my friends that I would post this dessert for over a month now, so here it is (finally!). This is one of my favorite non-chocolate desserts of all time. I usually make it during the summer, although I have read online that some people make it during Christmas. 

Crust:
                1 cup chopped pecans or walnuts
                1 cup flour
                1/2 cup butter or margarine, melted
                Mix and pat in bottom of 8 x 11 inch pan.  Bake at 350o for 10-12 minutes.  Cool.

Combine:
                1 cup cool whip
                8 oz. pkg. cream cheese
                1 cup powdered sugar
                Whip and spread on cooled crust.

Mix:
                1 large (6 oz)  package pastachio instant pudding with 3 cups of milk. Spread over cream mixture.  Chill. Serve topped with a thin layer of whipped cream and sprinkle with 1/4 cup nuts.


Tuesday, June 19, 2012

Chocolate Peanut Butter Cupcakes


A few weeks ago I volunteered to bring cupcakes to a friend's graduation party. Because cupcakes seem to be all the rage right now, I decided that I would try my hand at a "gourmet" treat. They turned out great. I used the chocolate cupcake recipe that I posted a few months ago, and topped them with peanut butter frosting and chunks of Reese's Peanut Butter Cups. Even though there were a few different desserts at the party, these definitely were the most popular.

Because I have already posted the recipe for the cupcakes, here is the recipe for the frosting:

1/2 cup margarine, softened
3/4 cup peanut butter
2 cups powdered sugar (or more, to taste)
1 tsp vanilla
2-4 Tbsp milk (as needed to reach desired thickness)

Combine all ingredients and beat until smooth. You can spread this over the cupcakes with a knife, or use a special icing kit if you want it to look all fancy.

Saturday, May 26, 2012

Authentic Mexican Tacos


Lately, my husband has been obsessed with going to taco stands. He goes to a taco stand for lunch at least once a week. So a few weeks ago I decided that I would try my hand at making them myself. Two of my brothers in law were over for dinner that night and WOW what a reaction. Everyone loved them; they even went back for seconds and thirds. This recipe is definitely a keeper.

2 1/2 lb. beef roast
1 large onion, chopped
2 tsp chili powder
3 cloves garlic, minced
3 tsp cumin
2 bell peppers, chopped (I used red and green)
1/2 cup beef broth
1 can Mexican style diced tomatoes
Salt, to taste (about 2 tsp)
corn tortillas

Combine chili powder, garlic, and cumin and rub on outside of roast. Place roast in slow cooker and top with chopped onions and diced tomatoes. Pour beef broth over top. Cook on low for 6-8 hours. Shortly before serving, shred beef and stir in salt. Serve over warm corn tortillas with pico de gallo, hot sauce, and guacamole.

Friday, May 25, 2012

Spicy Basil Chicken


This is an Asian-inspired dish that I will definitely make again. When I saw the recipe on For the Love of Cooking, I knew that it had to be good (does she even make something that isn't good? I love that blog!) I still wouldn't say that it tastes like something out of a Chinese restaurant, but my husband and I both liked it a lot.

Serves: 4
Prep time: 10 minutes
Cook time 15 minutes

2 tsp canola oil
2 green onions, thinly sliced
1 cup chicken, cut into bite sized pieces
3 cloves of garlic, minced
1 Tbsp oyster sauce
1 Tbsp soy sauce
2 tsp sugar
1 tsp hot chili sauce
1 tsp water
1/2 tsp cornstarch
1/3 cup fresh basil leaves, sliced

Preheat canola oil in a medium skillet over medium high heat. Add green onions and cook, stirring, approximately one minute. Add chicken and cook, stirring often, until completely cooked. Then add garlic and cook for another minute.

Combine Oyster sauce, soy sauce, sugar, chili sauce, water, and cornstarch. Pour mixture over the chicken and cook until the mixture thickens, approximately 1 minute. Then, remove chicken from heat and stir in basil leaves. Serve over rice.


Thursday, May 24, 2012

Cilantro Ranch Dressing


I got this dressing from snaptheconference.com and did it almost exactly the same as she did. It wasn't quite the same as Cafe Rio, but it was close enough. We really liked it anyway. I only added 1/4 tsp cayenne pepper, but in the future I will definitely add more. I like that spicy kick that it gives.

1 pkg Hidden Valley Ranch dressing mix
3/4 cup mayonnaise
3/4 cup sour cream
1/3 to 1/2 cup milk
1/2 bunch cilantro
1/8-1/4 cup salsa verde
2 cloves garlic, minced
lime juice from 1 lime (approx. 2 Tbsp)

Combine everything in a blender and blend until creamy and smooth. Refrigerate for an hour before serving.

Cafe Rio Salad


My husband and I love Cafe Rio and we love copycat recipes, which made this one of our ideal meals. Even though it wasn't identical to Cafe Rio, we were impressed with how close it was. We had been talking about making this meal for several months, but never got around to doing it, so last week I decided to surprise my hubby with it. When he found out what was for dinner he got so excited! I think that is my favorite thing about cooking. I love making things that make other people happy. I created this recipe by taking ideas from a couple of different reciepes that I found online.

Serves about 10 people (depending on how much meat you like on your salad)
Prep time: 20 minutes
Cook time: 12 hours

Meat:
2-3 lb pork roast
1/8 cup brown sugar
1 tsp cayenne pepper
1 Tbsp cumin
4 cloves garlic, minced
1 tsp salt
1 can Dr. Pepper
3/4 cup chicken broth
2 large onions, chopped
1 1/4 cup brown sugar

Other Salad Ingredients:
Romaine lettuce
Large tortilla (freshly cooked is best)
Pico de Gallo
Tortilla strips
Guacamole
Black beans
Rice
Cilantro
Cilantro Ranch dressing

Combine brown sugar, cayenne pepper, cumin, garlic and salt, and rub on roast. Cook on low for 3 hours, then add Dr. Pepper, chicken broth and onions and cook for another 8 hours. About an hour before serving, shred roast and add brown sugar; if desired, add more sugar and salt to taste.

Prepare the salad by first placing a large tortilla in a shallow bowl, then add rice, beans, meat, lettuce, pico de gallo, and guacamole. Garnish with tortilla strips and cilantro.

Friday, May 4, 2012

Chocolate Pretzel Snaps


The first time I ever had these was when my mom made them for a baby shower. They are SO delicious and completely addictive. For the baby shower, she used the pastel colored spring M&Ms. Afterwards I came home and made a batch for myself. After they cooled down, I put them in a bowl and set them on the counter. I thought they would be a nice little snack for the next few days. Unfortunately, we polished them off in less than a day!

Pretzel Snaps
1 bag Hershey's chocolate kisses
1 bag plain M&Ms

Preheat oven to 350°. Place pretzels on a cookie sheet. Place one chocolate kiss on each pretzel. Heat in oven for 2-3 minutes or until kisses are melted. Top each kiss with an M&M. Cool completely before serving.


Thursday, May 3, 2012

Light Wheat Rolls


The other day, I was in charge of bringing rolls to dinner. I wanted to make wheat rolls and ended up finding this recipe on Allrecipes.com. It got near perfect reviews from over 300 people so it was pretty much a guaranteed hit. The rolls did taste good and their spiral shape made them very fun to eat.

Makes 2 dozen rolls

Preparation time: 3 hours

1 1/2 Tbsp active dry yeast
1 3/4 cup warm water
1/2 cup white sugar
1 tsp salt
1/4 cup margarine, melted
1 egg
3 cups whole wheat flour
2 cups white flour
1/4 cup gluten flour

Combine water, yeast, sugar and salt in a large bowl. Allow the yeast to activate, then stir in wheat flour. Add margarine and egg and stir until combined. Add white flour 1/2 cup at a time until you have a dough that is soft and elastic. Knead dough for about 8 minutes, then allow it to rise until double in size in a lightly greased bowl (about an hour).

Punch down dough, cover, and then allow to rise again for about 30 minutes.

Divide dough into two equal portions and roll out dough into two 6 x 14" rectangles. Cut into 12 strips and roll each strip. Place each roll into a greased muffin cup, brush with butter and allow to rise, uncovered, for about 40 minutes, or until double in size. Bake at 400­° for 12-15 minutes. Remove from oven and brush with melted butter.