Wednesday, August 15, 2012

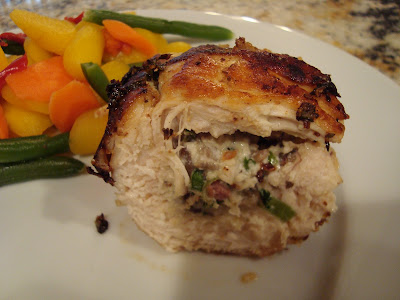
Chicken Stuffed with Ricotta and Bacon


This was one of the best meals that my husband and I have had in a long time. For months now, I have been wanting to try some sort of stuffed chicken breasts. There are tons of different recipes out there, but I always imagined that the preparation would be so difficult and time consuming that I wouldn't be able to handle it, especially with a baby that wants to be held constantly. I finally decided to do it and it actually wasn't too bad! I felt like it went pretty well - definitely worth the extra time. The only thing I would change next time is that, rather than trying to pound out the huge chicken breasts that I had, I would first slice them in half (like a hamburger bun) so they were already pretty thin, then pound them out. Even after pounding for quite a while, I feel like I still didn't pound my chicken thin enough.

Prep time: about 1 hour

Serves: 4

2 large chicken breasts, sliced in half and pounded out
2 slices bacon, cooked and cut into small pieces
1 tsp olive oil
1 small onion, chopped
2 green onions, chopped
2 cloves of garlic, minced
1/2 cup ricotta cheese
1/8 cup Parmesan cheese, shredded
1/4 cup spinach, chopped
1/2 tsp oregano
1/2 tsp basil
1 Tbsp fresh parsley, chopped
Salt and freshly ground pepper, to taste
1 Tbsp olive oil

Prepare chicken breasts so that they are thin (about 1/4"). Then, in a medium skillet, cook the bacon. Drain bacon grease from skillet and add tsp olive oil. Saute onion, green onions, and garlic until onion becomes translucent. Remove from skillet and allow mixture to cool.

In a separate bowl, combine bacon, ricotta, Parmesan, spinach, oregano, basil, and parsley. Stir in onion mixture and season with salt and pepper.

Spoon prepared mixture onto the center of chicken breasts. Roll them up and secure them with toothpicks. Add 1 Tbsp olive oil to the skillet that you used for the bacon and onions mixture. When it has preheated, place the chicken rolls, seam side down, in the pan and cook for 5-6 minutes. Continue to cook, carefully rolling the chicken breasts so all sides are golden brown and fully cooked, another 10 minutes approximately. 

When the chicken is fully cooked, allow it to rest for about 5 minutes, and then slice and serve.
Monday, August 13, 2012

My New Blog

I just started a new crafting blog called Little Card Corner. I mostly do card making, but I occasionally dabble in other craft projects as well. Within that blog, I am also doing two series: Card Making Basics (Tuesdays), and Crafting on a Budget (Thursdays). In these posts, I share helpful tips and information that I have picked up over time.

If you are already an avid crafter or are looking for a new hobby, stop by my blog! Here is an example of a Father's Day card that I made this year:


Saturday, August 11, 2012

Shredded Pork Burritos


When I first got my Crock Pot, I didn't use it very often because I felt like a lot of the slow cooker recipes were pretty much the same. Over time, I have found a lot more ways that I can use mine, which have allowed me to use it a lot more often. I actually have two slow cookers now: a small one and a large one. One of the biggest advantages to using a Crock Pot during the summer is that it allows me to slow cook meat so that it is nice and tender, without having the kitchen heat up along with the oven. I make a lot of my most delicious and easiest Mexican-style recipes with meat that I cooked in my slow cooker.

1 1/2 lb pork roast
1/2 cup chicken broth
1/2 medium yellow onion, chopped
2 tsp cumin
1/2 tsp chili powder
1 tsp oregano
1 tsp onion powder
1/2 tsp paprika
2-3 cloves garlic, minced
1/4 cup cilantro, chopped
1 Tbsp fresh lime juice
Salt and freshly cracked pepper, to taste

Place roast, chicken broth, onion, cilantro, and spices in a slow cooker. Cook on low for 6-8 hours or on high for 3-4 hours. Shred meat with two forks. 

Other great recipes for these burritos are:
Pico de gallo


Friday, August 10, 2012

Cilantro Lime Rice


Another great component of the burritos we had recently (the meat recipe is coming up soon!), this rice had a great flavor. Historically, I have usually made plain white rice without adding any seasonings other than salt. Lately, I am really liking the idea of seasoning rice so that it complements the flavor of the other parts of the meal. I made these few last minute additions to the rice and I was really pleased with the results.

1 cup white rice
2 cups water
1/4 cup cilantro, chopped
juice from 1-2 limes (approximately 2 Tbsp)
1 tsp salt

In a medium saucepan, boil water, rice and salt for approximately 20 minutes or until the water is completely absorbed and the rice is soft. Stir in lime and cilantro just before serving rice.


Thursday, August 9, 2012

Black Beans


I use black beans a lot in burritos, tacos, nachos and other things. Of course I like them best when they are freshly boiled, but lately I have eaten a lot that were canned. I often heat them up and add a few spices, but this time I decided to add a few more things for a little bit of extra flavor. I thought they turned out great - perfect for the burritos that we used them for. I may just use this as my "go to" black bean recipe in the future.

1 Tbsp canola oil
1 can black beans, rinsed
1/2 can (about 3/4 cup) diced tomatoes, rinsed
1/2 medium yellow onion, finely chopped
1 clove garlic, minced
1 tsp cumin
1/2 tsp chili powder
1/2 tsp oregano
salt and freshly cracked pepper, to taste

Preheat oil in a small saucepan over medium heat. When the oil glistens, add onion and cook, stirring, until it begins to be transparent. Then add remaining spices and ingredients. Cook, stirring occasionally, for 8-10 minutes or until everything is thoroughly heated. The longer you cook it, the more the flavors will combine.

Wednesday, August 8, 2012

Blackberry Nectarine Smoothie


My husband and I are still pretty stoked about our new Ninja blender. All of our friends seem to be on kind of a health kick while we, on the other hand, seem to be eating more and more desserts. (It doesn't help that people keep bringing us treats. How can we possibly say no to such delicious gifts?) We do want to start to be a little bit more healthy, though, so we made this smoothie as kind of a healthy dessert a few nights ago.

When I make smoothies, I like to use some fresh fruit and some frozen fruit, rather than using a lot of ice. It seems to make a thicker smoothie, which I like.

Prep time: 5 minutes

Serves: 2

2 cups frozen blackberries
2 fresh nectarines
3/4 cup plain low-fat yogurt
1/8 cup sugar (or to taste)
1/2 cup orange juice (more or less for desired thickness)

Blend all ingredients until smooth. Enjoy!

Tuesday, August 7, 2012

Mango Lassi


A few weeks ago, I was taking with a friend of mine about how much I love Indian food. She told me that she orders a Mango Lassi every time that she goes to an Indian restaurant. After she said that, I was dying to try one. I went to Bombay House and loved the one that they had there, so I decided to figure out how to make one at home. Of course it was even better because I got to use my Ninja blender! This recipe isn't quite as sweet as the one I had at the restaurant because that is the way I like it. You could add more sugar if you prefer.

Prep time: 5 minutes

Serves: 2 people

2 mangos
1 3/4 cup plain (or greek) yogurt
1/2 cup (a little less) sugar
1 cup ice

Combine everything in the blender and blend until smooth. Enjoy!

Monday, August 6, 2012

Roasted Tomato and Olive Bruschetta


This is the first recipe that I used with my Ninja Blender. It was one that I found in the owner's guide that came in the box, but made a few of my own alterations (mostly because I didn't have fresh tomatoes). This was a quick and easy appetizer and we liked it a lot. I will definitely use this recipe when I have guests over. This recipe was the first time that I got really excited about my new blender. It was great! Afterwards, I searched "ninja blender recipes" online and realized that there are hundreds of recipes that I can try. What a great cooking tool!

Prep time: 1 hour (including baking time)
Serves: 6 (depends on desired serving)

1 can of stewed tomatoes, drained and rinsed
1 Tbsp olive oil
salt and pepper, to taste
1 clove garlic
1/4 cup black olives
1/2 tsp dried basil
1 loaf Baguette, sliced and toasted

In a medium bowl, toss tomatoes with olive oil and desired amount of salt and pepper. Place the tomatoes on a baking sheet and bake at 350° for 30-40 minutes. Remove from oven and cool slightly.

Add tomatoes, garlic, olives, and basil to the blender. Pulse for a few seconds, or until vegetables are roughly chopped. Serve warm or cold over baguette slices.


Friday, August 3, 2012

Ninja Blender


For my birthday, I asked for a really nice blender. I hadn't ever done any research on blenders before, but the cheap one that we got for our wedding had a crack in the base and I was sick of the smell of the burning motor every time I tried to use it. 

So my husband did a lot of research and found the Ninja Kitchen System 1100 Blender And Food Processor (Google Affiliate Ad). It is a great blender that is much more affordable than other professional quality blenders. One thing I really like about it is that the bottom is flat and the blade is easily removable so that it is easy to clean and the blended food doesn't get stuck in the bottom, like it did with my old blender. 

This blender comes with two pitchers. I have only used the small pitcher so far because there are only two of us and I don't need the entire capacity of the large blender. I have already used it for lots of different recipes, some of which I will be posting this coming week. I have used it to crush ice, chop vegetables, make cookie dough, and make smoothies and I haven't been disappointed yet!

Click on the label in the side bar of this blog for some of the recipes that I have tried with my Ninja blender.


Thursday, August 2, 2012

Carne Asada Tacos


My husband had an extremely busy week on the week of my birthday. I know that he wanted to make my birthday special, and would insist on making me dinner even though he was working 12 hours a day so I chose something that would be quick and easy and that wouldn't have too much clean up. I found this amazing Carne Asada recipe and knew it had to be my birthday dinner. I put the marinade together the night before so all my husband had to do was grill the meat on his barbecue (one of his favorite activities). We worked together to make pico de gallo and guacamole and had the dinner ready in no time at all.

Prep time: 10-20 minutes (and marinate over night)

Serves: 4 people

1 1/2 lb flank steak
1 tsp cumin
1/2 tsp black pepper
2 tsp salt
1 tsp garlic powder
1 tsp paprika
2 tsp cumin
1 tsp onion powder
1 tsp chili powder
2 tsp oregano
5 cloves garlic, minced
1/8 cup lime juice (or juice of two limes)
1/2 cup reduced sodium soy sauce
1/2 cup olive oil
1/3 cup vinegar

Combine all ingredients in a Ziplock bag, mixing thoroughly before adding flank steak. Marinate for between 6 and 24 hours.

Over a preheated barbecue, grill until the meat reaches your desired level of doneness. Remember that the meat will keep cooking for a few minutes after you have removed it from the heat. Let the meat rest for several minutes before slicing across the grain.

Serve over corn tortillas with pico de gallo, guacamole, and hot sauce.


Wednesday, August 1, 2012

Coconut Rice


This rice has just the right amount of coconut flavor. Enough that you can taste it, but not so much that it is overpowering. It was the perfect complement to the Mandarin Orange Chicken that I posted a few days ago.

1 cup white rice
1 14 oz can light coconut milk
3 Tbsp water
1/2 tsp salt
1/8 cup coconut

Combine rice, coconut milk, water, and salt in a medium sized saucepan over medium heat. When it comes to a full boil, reduce to medium-low and cook for approximately 20 minutes or until the liquid has completely absorbed and the rice is soft. Stir in the coconut and serve hot.