Tuesday, December 27, 2011

Chicken and Rice


This is another super simple dinner that my mom often made when I was growing up. She didn't usually fry the chicken first, from what I can remember, but I thought it was a nice touch. The chicken is always good - tender and moist - but my favorite part by far is the rice. It has such a great flavor. I love the texture too. So I guess this is kind of a comfort food for me. One thing to remember is that this dinner needs to be prepared in advance - it only takes a few minutes to put it together but it bakes for nearly two hours! Enjoy!

1 1/2 cups rice (not instant)
9 pieces chicken
3 cans cream soups (usually cream of chicken and cream of mushroom)
1 cup milk

Mix soups, milk and rice together and spread in a 9x13" pan. Top with chicken. Cover with foil and bake at 350° for 1 1/2 to 2 hours. 

*Optional: coat the chicken with a thin layer of flour and fry in olive oil so that the surface is crispy and golden. It doesn't need to be cooked all the way through. 

Thursday, December 22, 2011

Authentic Swedish Meatballs


Even though I have made Swedish Meatballs before, I decided to try a new recipe this time. My husband said he actually liked them more than the first ones because he thinks they tasted very authentic. They had a little sweet flavor that really complemented the savory mixture. Luckily, we actually had lingonberry preserves and they were a great addition. I used whole wheat bread, which I thought was an excellent choice because it really added a great texture to the meatballs.

Meatballs:
1/2 onion, very finely chopped
1 tsp butter
1/4 cup milk (or a little more)
2 slices whole wheat bread, in small pieces
1 egg
1 lb ground beef
1 tsp salt
1/2 tsp nutmeg
1/2 tsp cardamom
1 tsp black pepper

Sauce:
3 Tbsp butter
2 cups beef broth, warmed
1/4 cup sour cream
salt and pepper, to taste
2 tsp lingonberry preserves (can substitute raspberry or cranberry preserves)

Heat butter in a skillet over medium heat. When butter has melted, saute the onion until is has softened, about 3-4 minutes.

Mix milk and bread together and let soak for a few minutes. When the bread is soggy, puree it in a blender or a food processor. Then, mix all meatball ingredients together and combine thoroughly. Form meatballs and place them on a plate. I made 21 meatballs, although yours may be bigger or smaller.

Preheat a pan on medium with 3 Tbsp butter. When the butter is completely melted, place about half of the meatballs on the pan - be careful not to over crowd the pan. Brown them on all sides, turning them carefully. They do not need to be cooked all the way through at this point. When meatballs are brown, remove from pan and cook remaining meatballs. Remove them from the pan as well.

Use a whisk to stir flour into remaining butter. When it begins to sizzle, slowly add the beef broth, stirring constantly in order to form a smooth sauce. Return meatballs to pan and turn stove to medium-low. Cover, and simmer sauce with meatballs for about 10 minutes or until meatballs are thoroughly cooked. Remove sauce from heat and place the meatballs in a serving dish. Stir sour cream and lingonberry preserves. Taste and reseason if necessary. Pour over meatballs. Serve over egg noodles.

Wednesday, December 21, 2011

Beef and Bean Chimichangas


When I told my husband we were having chimichangas for dinner, he was pretty excited - until he heard that they were "healthy." I don't know how people usually make these, but I think he was hoping that they would be deep fried. Once he had them, though, he wasn't disappointed anymore. They were great! With only a few simple ingredients, these only took me about 20 minutes to make. Leftovers were great too - we just heated up the meat and fried them up and they tasted just like they did the first time.

1 lb ground beef
1/2 onion, chopped
1 tsp olive oil
3 cloves garlic, minced
1 tsp coriander
1 tsp paprika
1 tsp chili powder
1 tsp cumin
1 tsp oregano 
1 tsp onion powder
salt and pepper, to taste
1 can chili beans
pepper jack cheese, shredded
3 Tbsps canola oil
flour tortillas

Heat the olive oil on a skillet over medium heat. Add ground beef and break apart into smaller pieces. Add onions and seasonings. Cook, stirring, for about five minutes until beef is brown and onion is tender. Stir in chili beans and cook for another few minutes until the mixture is warmed completely through.

Preheat canola oil on a skillet over medium heat. Heat tortillas for about 20 seconds in the microwave to soften. Sprinkle desired amount of pepper jack cheese on tortilla and top with beef and bean mixture. Fold sides of tortilla and roll like a burrito. When the oil is hot, place tortilla in the skillet, seam side down. Cook until surface of tortilla is golden brown and crispy. Turn over carefully and cook opposite side. Serve hot with salsa, sour cream, and guacamole.


Tuesday, December 20, 2011

Tater Tot Casserole


Okay, so this isn't the best picture ever. In all honesty, I think it would be difficult to take a picture that made this dish look good. Nevertheless, it actually is. This is a dinner that I really liked when I was little, so I guess it is kind of like comfort food for me. It is very simple to make and doesn't take very long. Maybe it isn't the type of dinner that I would make for guests, but I love it for a chill evening at home with the family.

1 32 oz. package frozen tater tots
1 lb ground beef
1/2 cup onion
1 can cream of chicken soup
1 can cream of mushroom soup
1 cup sour cream
salt, pepper, and garlic to taste
1 cup cheddar cheese

Preheat oven to 400°. Preheat a skillet on medium-high. Cook beef and onion together until beef is brown and onions are tender. Add soups, sour cream, and seasonings to taste. Simmer for 5-10 minutes. Pour tater tots into a 9x13" casserole dish. Top with beef mixture and cheese. Bake for 20 minutes or until tater tots are warm all the way through.

Monday, December 19, 2011

Snickerdoodles


So, I made these cookies for the first time last year. I had tasted them before, but never made them myself. I actually had some cream of tartar in my cabinet, although I don't know where it came from. Those cookies didn't turn out very well so I threw away the cream of tartar (who knew how old it was, anyway) and gave up on the idea of ever making them again. But just yesterday I got courageous and decided to try them again. I considered the possibility that it might be the recipe I used, so I looked up a new recipe on the internet. Since I didn't have cream of tartar, I substituted a little less than 4 tsp of baking powder for the cream of tartar and baking soda and WOW these cookies turned out great - crispy on the edges and soft in the middle. I also added red sprinkles to make them "Christmasy" Ironically, I compared the two recipes and they turned out to be exactly the same.


1 cup butter, softened
½ cup sugar
2 eggs
1 tsp vanilla
¾ cups flour
½ tsp salt
1 tsp baking soda
2 tsp cream of tartar


4 Tbsp sugar
2 tsp cinnamon


Cream butter and sugar in a medium bowl. Stir in eggs and vanilla. Then mix in all dry ingredients. Roll into balls and cover in cinnamon sugar. Bake at 350° for 10-12 minutes. 


Friday, December 16, 2011

Spare Ribs


I found spare ribs on a good sale the other day at the grocery store. Even though I have made baby back ribs quite a few times, I had never made spare ribs before. I was looking for a recipe online when I remembered that my mom has a great one. She actually made it for dinner when we had my husband's family over for the first time, the night before my wedding. My husband said he actually remembered them and that they tasted really good so I called my mom and asked for the recipe. They were very easy and tasted great - just the way I remembered. She served them with scalloped potatoes and salad. Although she makes them in a roaster, they are also great when made in a slow cooker.

4 lbs. spare ribs 
1 medium onion, finely sliced
2 Tbsp lemon juice
4 Tbsp brown sugar
1 cup ketchup
4 Tbsp Worcestershire sauce
1 Tbsp prepared mustard
1/2 cup celery, chopped

Cook ribs in an open pan at 425° for 30 minutes to brown. Drain fat. Transfer to roaster (or slow cooker) and cover with sauce. Cook at 325° for 2 hours or 275° for 3-4 hours. 

Thursday, December 15, 2011

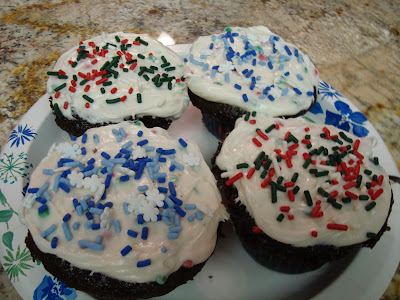
Chocolate Cupcakes


One of my best friends was throwing a birthday party for her son a few weeks ago and told me that she was looking for a cupcake recipe that didn't use shortening and that would be moist without being greasy. Although I have never made homemade cupcakes before, I thought I would do a little research for her. I found a recipe that looked good on my favorite cooking blog For the Love of Cooking. It seemed to meet all of the criteria, and I have never found a bad recipe on that blog, so I went ahead and sent it to her, even though I had never tried it. She ended up using that one for the party and said it turned out well. Ever since then I have been just waiting for a good time to try it. That time came just last night, when I decided to take Christmas cupcakes over to a neighbor. 

These were definitely very moist and tasted good. I felt like the chocolate taste was a little bit too rich when I ate them alone, but with frosting, they were just perfect. The one mistake I made was to fill the cups too much so they overflowed and the top part stuck to the pan a little. 

1 cup sugar
1 cup brown sugar
1 3/4 cup flour
3/4 cup cocoa powder
1 1/2 tsp baking soda
1 1/2 tsp baking powder
1/2 tsp salt
2 eggs
1 cup milk
1/2 cup canola oil
2 tsp vanilla
1 cup boiling water

Preheat oven to 350° and place 24 cupcake liners in muffin pans. Sift together dry ingredients, then beat in eggs, milk, oil, and vanilla with a hand mixer. Add boiling water and stir until blended. The mixture will seem watery. Using a ladle or measuring cup, pour batter into muffin liners, filling approximately 2/3 full. Bake for 20-22 minutes or until a toothpick inserted into center comes out clean. Cool completely before frosting and decorating.


Wednesday, December 14, 2011

Fried Rice


This is the best fried rice I have ever tasted. I was watching Man vs. Food Nation with my husband a few weeks ago. Actually, I think it was the Thanksgiving episode. They visited a restaurant in Hawaii who claimed to have great fried rice. Although they didn't give away their secret recipe to the entire viewing audience, they did mention a few key ingredients, which we quickly wrote down and vowed to incorporate the next time we made fried rice. I am including rough estimates of the amounts that we used, although we didn't actually measure things out this precisely.

1/4 lb. bacon, cut into 1" pieces
1/4 lb. chorizo, cut into small pieces
2-3 Tbsp canola oil 
4 cups cold prepared white rice
1/2-3/4 cup peas and carrots
3-4 Tbsp oyster sauce (according to preference)
2 eggs
1/4 cup green onions, chopped
Salt and Pepper, to taste

In a wok or large skillet, cook bacon and chorizo over medium-high heat. When it is fully cooked add oil and rice. Stir fry for a few minutes. Add oyster sauce. Stir in peas, carrots and green onions. Push rice to the side and scramble eggs, stirring them into rice when they are finished cooking. Season with salt and pepper to taste.


Tuesday, December 13, 2011

General Tso Chicken


One of my friends recently published this recipe on facebook. She just raved about how great it was, so I definitely had to try it. It was a yummy dinner that didn't take too long to make. I also appreciated the fact that I didn't have to go out and buy any expensive specialized ingredients. The only thing is that I have yet to find a recipe for a single Chinese dish that actually tastes like the things I get when I go to a Chinese restaurant. Still, I wouldn't be nervous about making this one for other people. I liked it and so did my husband (who is ultra-discriminating about food, even though he claims that he isn't).

1 lb chicken breast, cut into small pieces
Flour
2 Tbsp vegetable oil
1/4 cup sugar
1/4 cup low sodium soy sauce
1/4 c. unsweetened pineapple juice
1/4 cup white distilled vinegar
2 cloves garlic, minced
1 tsp fresh ginger, finely grated
1/4 tsp cayenne pepper
1 Tbsp cornstarch, mixed with 3 Tbsp water
4 green onions, sliced

Preheat a wok or skillet with vegetable oil over medium heat. Cover chicken in flour and fry until golden brown. Drain excess oil. Sprinkle cayenne pepper over chicken and turn heat to low. 

In a saucepan, combine sugar, soy sauce, pineapple juice, vinegar, garlic, and ginger, and heat gently. When sugar has dissolved and sauce is at the point of boiling, slowly add cornstarch mixture, stirring constantly until the sauce has reached your desired thickness. Pour sauce in the wok and stir to coat chicken. Stir in green onions. Remove from heat and serve with rice.

Monday, December 12, 2011

Cannoli


Although I grew up in the States, I feel like I have a strong connection with my Italian ancestors. Family heritage is something that is really important to me, especially when it has to do with food. One of my favorite stories is about my great grandmother making Canolis and frying the shells on the end of a broomstick. While many modern chefs choose to use special metal tubes that were specifically designed for making these delicious pastries, I don't see anything wrong with the old fashioned way. I actually used a wooden dowel that had been cut into 8" pieces. I cured them by soaking them in vegetable oil and then baking them in the oven on 200° for an hour (I found someone online who said that is what you should do - I don't know if it really made a difference). 

There are generally two types of Cannoli filling. One uses ricotta cheese and one is just milk and sugar (basically). This "non-cheese" recipe seemed easy (and tasted GREAT - much better than those disgusting Cannolis I tried last week at Kneaders - blech...). I decided to add about 3 oz of cream cheese to the filling - non-traditional, I know - so I won't include it in the recipe.

Cannoli shell:
4 cups of flour
3/4 cup Crisco
1/2 cup sugar
1 egg
20 Tbsp cold water (there are 16 Tbsp in a cup)
1/2 tsp cinnamon

(makes approximately 50 small cannolis or 20 large ones)

Stir together flour, sugar, and cinnamon. Cut the shortening into the dry ingredients, stirring until the mixture is approximately pea sized, then add the egg and slowly stir in the water until it forms a ball.

Preheat a pan of canola oil on medium-high. When the oil sizzles with a splatter of water, you know it is ready. Gently place several cannoli shells in the oil and fry until they are a deep golden color. When you remove the shells, place them on a paper towel to soak up the extra oil.

The shells can be made several days in advance and refrigerated.


Cannoli filling:

5 cups milk
1 cinnamon stick
2/5 cups sugar
1 cup cornstarch
1 tsp vanilla


Heat 4 cups sugar, milk, and cinnamon over medium heat. Mix remaining cup of milk with cornstarch. When milk comes to a boil, add cornstarch/milk mixture. Mix until thick, stirring continuously. Scrape the bottom of the pan as you stir so the milk doesn't burn. Refrigerate until cool, then stir in vanilla.


Use a pastry bag to fill shells with filling. Dip ends of cannolis in crushed chocolate pieces or nuts. Sprinkle powdered sugar over top.


Thursday, December 1, 2011

Sausage, Egg and Cheese Croissant


Although this recipe is very easy, I thought I would include it as a memorial to the delicious breakfasts that are often authored by my husband. I generally wouldn't consider myself a "breakfast person." I generally prefer a small piece of fruit or toast, if I have anything at all. Still, I really like breakfast food and have found that I am much more likely to make breakfast for dinner. Here is a little something that we whipped up for dinner one night last week when we were in the middle of packing for our most recent move.

1/4 lb sausage
4 eggs
salt and pepper to taste
cheese
croissants (prepared according to package instructions)

Cook sausage thoroughly in a medium skillet. Add eggs and scramble, adding salt and pepper to taste. Cut freshly baked croissants in half and layer egg and cheese in the middle. If the cheese doesn't melt, consider microwaving the croissant for 15-20 seconds to help it along.


Wednesday, November 30, 2011

Blackberry Pie Filling


I have a few friends that are avid "coupon-ers" and always insist on posting their best deals on facebook. I have never been entirely convinced by the coupon movement - especially because I prefer to cook with a lot of fresh fruits and veggies - but I have to say that I also get some really great deals on occasion, without even cutting out a single coupon. Last week, I found blackberries for sale for $1 per box. Normally they are $3.99 a box! My husband always talks about picking Oregon blackberries as a child and eating fresh blackberry cobbler, so I bought 5 boxes (4 to use in the cobbler and one just to eat). His mom told us she usually made pie and cobbler filling with just sugar and flour so we decided to give it a go. 

4 cups blackberries
1/4-1/2 cup sugar
1/2 cup flour

Combine sugar with blackberries and let them sit until they start to become juicy. Taste them to make sure that they are sweet enough. If not, add more sugar and wait another few minutes. Then, carefully fold in the flour and pour into pie pan or cobbler dish. 


Thursday, November 24, 2011

Salisbury Steak with Caramelized Onion Gravy


The very first person that ever looked at my blog (other than me) was a nice lady named Mary. To this day, I have no idea how she found it when I only had made two posts, but she has made a few very kind comments that are part of the reason that I have kept up my blog for this long, even though I don't really have very many people who follow it. Mary has an excellent cooking blog called One Perfect Bite. With years of experience, she posts great recipes - some that she invented or has used for a long time, and some that she makes as a tribute to other chefs. In my never-ending search for new recipes, I found this one on her blog. Her pictures of it are much better than mine, so I recommend that you visit her website and look at them. 

I had heard of Salisbury Steak before I found it on her blog, but I didn't really know what it was. She explained the background of the dish so well that I was convinced it was a Great American Tradition and that I had to try it. I attempted to follow her recipe pretty much exactly, although I might have made a few mistakes (for example: I didn't read the whole recipe before I planned the meal so I didn't realize until it was too late that it was supposed to be served over mashed potatoes or noodles. Oops.) but I still thought it was great - very flavorful - and am definitely going to make it again in the future. I hope it is okay that I re-post the same recipe with almost the same wording as Mary has it on her blog.


Onion Gravy:
2 large red onions, thinly sliced
2 Tbsp unsalted butter
2 Tbsp all-purpose flour
3 cups beef broth
1 Tbsp tomato paste
1 tsp cider vinegar
Salt and Pepper to taste

Meat Patties:
1 lb lean ground beef
1/2 cup cooked white rice
1 egg yolk
1 tsp salt
1/4 tsp pepper
1 clove minced garlic
1 tsp Worcestershire sauce
3 Tbsp chopped parsley
1/2 tsp dried thyme
1 Tbsp olive oil

To make gravy, heat butter in a large panAdd onions and cook over medium-high heat, stirring occasionally. When onions are softened and turning golden brown, add 1/4 cup beef broth. Reduce heat, cover and continue cooking, adding more broth as needed. It should take approximately 25 minutes to caramelize the onions. Stir in flour and cook for about 2 minutes. Stir in remaining beef broth and tomato paste. Stir in cider vinegar. Simmer for 10 minutes. Add salt and pepper to taste. Reduce heat to low and keep warm.

To make patties: Mix ground beef, rice, egg yolk, salt, pepper, garlic, Worcestershire sauce, parsley and thyme in a bowl. Shape into 4 oval patties about 3/4-inch thick. Heat olive oil in a large nonstick skillet set over medium-high heat. Sear patties about 3 minutes per side, or until a brown crust forms. Pour gravy over patties and simmer for an additional 10 minutes. Serve warm with mashed potatoes or noodles. 

Wednesday, November 23, 2011

Blueberry Cream Cheese


My husband and I decided to make Stuffed French Toast for breakfast, but we had to go grocery shopping for ingredients. Unfortunately, our pathetically under-stocked grocery store didn't have any blueberry cream cheese. Although we could have chosen to buy strawberry, my sweetheart had his heart set on blueberry, so we decided to make our own. It turned out awesome - although I guess it kind of did taste like pie filling. :) It was a great breakfast.

1/2 can blueberry pie filling 
8 oz cream cheese

Soften cream cheese in the microwave (approx. 30 seconds) or let it rest at room temperature for a couple of hours. Combine pie filling and cream cheese with a hand mixer. Taste cream cheese and add more pie filling if necessary.


Tuesday, November 22, 2011

Chef Todd's Seasoning


A few months ago, I went to a cooking class hosted by my church. The guest chef was the one and only Chef Todd. He is actually a member of the ward, and was doing the class as a free service. He has received numerous awards for his cooking and is the executive chef at Salt Lake's Blue Lemon restaurant. He also teaches cooking classes at various locations throughout the area. 

During the class, he mentioned that he has his own seasoning blend that he uses in a lot of his cooking. Of course, I am always up for trying a new type of seasoning so I joined the (long) line of people who bought the seasoning that night. Although, there is really no "magical" seasoning blend that can turn a bad chef into a good one, I would say that this blend comes pretty close. So far, I have used it in an Italian pasta salad, on chicken, and as a go-to seasoning for various other things. 

I highly recommend this seasoning.... and I'm not even getting paid to post this review! You can buy it online at Chef Todd's website or at Orson Gygi in Salt Lake.

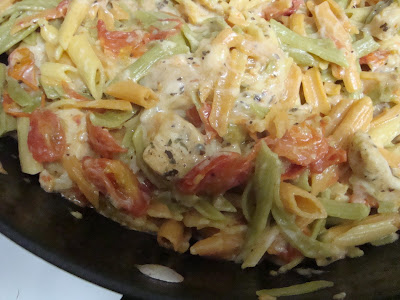
Tomato Basil Penne with Chicken


I really like making pasta and "Italian" food for dinner, but sometimes the traditional red sauce or white sauce recipes get kind of old. I was looking for something interesting I could make with penne pasta and I stumbled upon a recipe that looked really good. I made a couple of changes to the recipe to make it my own. It was really good and VERY easy to make. It only took about 20 minutes total. I would recommend this recipe to anyone - especially those busy people who want to spend as little time in the kitchen as possible, but still appreciate good food.

8 oz penne pasta, prepared according to directions on box
3 Tbsp olive oil, divided
3 tsp minced garlic
1 pint grape tomatoes, halved (more if desired)
1 cup shredded pepper jack cheese
1 cup shredded mozzarella cheese
1/4 cup grated Parmesan cheese
1 Tbsp minced fresh basil
1 1/2 lb chicken, cut into bite sized pieces
Salt and pepper, to taste

Preheat 1 Tbsp olive oil in a medium skillet. Cook chicken, seasoning with Chef Todd's seasoning until the meat is thoroughly cooked and begins to turn golden brown on the outside.

Then, heat 2 Tbsp olive oil in a large skillet on medium-high heat. Cook garlic, stirring, for approximately 1 minute. Add tomatoes, reduce heat to medium, and simmer for 10 minutes. Stir in cheeses. When they begin to melt, stir in cooked penne pasta and chicken. Season with fresh basil.


Monday, November 21, 2011

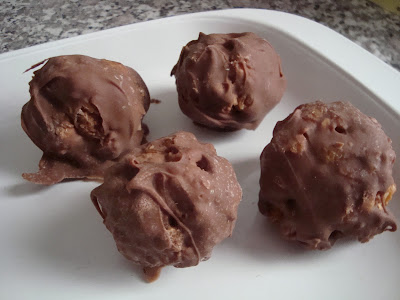
Chocolate Caramel Chews


I was searching the internet, looking for something to make for dinner, when I accidentally stumbled upon these amazing little treats. I knew I had to make them the moment that I saw them. They are practically like homemade candy bars. Actually, my husband thinks I should actually try to mass produce them and sell them, but instead I am just going to post them on my blog to share. Unfortunately I didn't write down the name of the blog where I originally found them, but just know that I didn't invent them myself.

36 caramels, unwrapped
3 Tbsp evaporated milk
1 cup crushed corn flakes
1 cup Rice Krispies cereal
1 cup flaked coconut
1 cup chopped nuts (I used walnuts)
6-8 oz chocolate, melted (I just used milk chocolate chips)

Melt the caramels and cream over the stove, stirring frequently until smooth. Combine the remaining ingredients in a large bowl. Stir caramel into dry ingredients. Shape into 1" balls and set onto waxed paper. Melt the chocolate in 20 second intervals in the microwave, stirring between each time. Coat chews completely in chocolate and allow chocolate to cool and harden before serving.


Saturday, November 19, 2011

Beef Pot Pie


This is another recipe that I used directly from the For the Love of Cooking blog. I was really excited to make beef pot pie, even though I am generally not the biggest fan of chicken pot pie. I made this recipe on a week that I was really assertive about planning all of my meals before going grocery shopping (usually, I end up running to the store about 3 times during the week to buy last minute ingredients that I need) and I wrote on my list "top sirloin steak" because that is the type of meat that she suggests in the original recipe. In all honesty, I don't feel very confident about my basic knowledge of cuts of meat. I had a hard time knowing which steak to get when I was at the store (although probably a regular stew meat would have worked just fine) so I chose the only one that was actually labelled "beef loin top sirloin steak." It was a little bit expensive, but it had been marked down and I had a $10 gift certificate to the grocery store so I didn't worry about it.

When my husband saw the type of meat I was using for the pot pie, he was appalled. This is not the first time that I have purchased an expensive cut of steak to put in a stew or casserole. I really need to stop doing that. Luckily, there was plenty left so we had a delicious steak barbecue for dinner the next night. Even without an expensive steak, this dinner would be amazing.

Crust (only for the top):
2 cups flour
3/4 tsp salt
1/3 cup oil
6 Tbsp ice water
2 Tbsp green onion, finely chopped

Mix all ingredients in a bowl. Roll out into a crust that is approximately 1/8" thick and the same shape as your casserole dish. Enfold in plastic wrap and refrigerate until ready to use.

Filling:
2 tsp olive oil
1 lb top sirloin steak, trimmed of fat and cut into 1" pieces
1 small yellow onion, diced
3/4 cup carrots, sliced
4 tsp minced garlic
6-8 small red potatoes, diced
salt and pepper, to taste
1 tsp thyme
1 Tbsp tomato paste
4 cups beef broth (divided)
1/2 cup cornstarch
2-3 Tbsp fresh parsley, chopped

Preheat the oven to 450°. Place diced potatoes in a pot of water and boil for 4-5 minutes. Drain and set aside.

Heat 2 tsp olive oil in a large pan over medium high heat. Add the beef and sear, stirring often for 1 minute. Add onions and carrots and continue to cook for 3-4 minutes. Add minced garlic, thyme, salt and pepper, and cook, stirring constantly for another minute. Stir in tomato past and 1/2 cup beef broth. Then add potatoes and 3 cups of beef broth. While the mixture is simmering, whisk together corn starch and remaining 1/2 cup beef broth and stir into mixture until thickened (about 2 min). Remove from heat and stir in parsley. Taste and re-season with salt and pepper if needed. 

Ladle the filling into a casserole dish and cover with crust, pinching to seal. Cut small slits in the top of the crust. Place pie in oven, over a baking sheet or tin foil, and bake 38-40 minutes. Remove from oven and let it rest for 15-20 minutes before serving.


Friday, November 18, 2011

Mexican Lasagna


Even though I have a number of different cooking websites that I refer to on occasion, I would have to say that my all time favorite is probably For The Love Of Cooking. When I am not sure what to make for dinner, that is usually the first place I go for ideas. While I sometimes make variations of her recipes, or simply use recipes as an inspiration for something that I want to make, I also follow some recipes exactly, like I did with this one. I loved this meal. It took me about 25 minutes to prepare and then another 30 to bake, but it was very easy and tasted great. Here is a link to the original recipe.

Ground Beef, prepared as taco meat
Onions, chopped
Salsa
4 flour tortillas
Refried beans, Mexican style
Cheddar cheese, grated
Black beans
Frozen whole kernal corn, thawed
Tomatoes, diced
Black olives, sliced
Green onions, sliced
Fresh cilantro, chopped

Dice and prepare all vegetables for the lasagna. Heat the olive oil in a medium skillet over medium heat. Add the ground beef and break up until it is in small pieces. Add onions and seasoning (although I used the combination of spices on the original recipe, I think regular taco seasoning would be just as good - maybe even better). Cook until the meat is done and the onion is tender, about 6-7 minutes.

Preheat the oven to 350°. Coat a baking dish with cooking spray. Add salsa to the bottom of the baking dish and coat evenly. Next add a flour tortilla (trim the sides, if necessary, in order to fit into the dish). Layer all other ingredients, spreading salsa over the top. Then, add another flour tortilla and repeat layering process 2-3 times.

On top of the final tortilla, spread a layer of salsa, cheddar cheese, and black olives. Cover with aluminum foil and bake for 25 minutes. Remove foil and bake for an additional 5-7 minutes or until the cheese is melted and begins to turn golden brown.


Monday, November 7, 2011

Halloween Sugar Cookies


A few weeks ago, I was thinking about my family Halloween traditions. One of my favorite parts of Halloween was decorating sugar cookies. My mom usually made a whole batch of cookies shaped like pumpkins. With orange icing, chocolate chips and candy corn, we all decorated jack-o-lantern cookies to our hearts content. I think I have probably only made sugar cookies one other time in my whole life, so I found a recipe in a cookbook that was compiled by ladies from my church about 10 years ago. I really like to use that one when I want to try a new recipe because I always figure that people wouldn't have shared a recipe unless they thought it was really good. I cut this recipe in half. It is also important to note that I made the dough and then left it in the refrigerator, wrapped in plastic wrap, until the next day when it was time to make the cookies. It worked just fine. These cookies turned out light and fluffy (for lack of a more descriptive phrase), kind of like those ones that they sell in the grocery store that are so popular. They were unique because of their almond flavor. Everyone said they really liked them.

2 cups sugar
2 cups margarine
6 eggs
4 tsp vanilla
2 tsp almond extract
7 cups flour
6 tsp baking powder

Cream butter and sugar. Add eggs one at a time, beating between each, and then add the remaining ingredients. When mixed, roll out and cut with a cookie cutter. Bake at 375 for 8-10 minutes.


Tuesday, October 18, 2011

Beef with Broccoli


Over the past few months I have been totally swamped with work. As a freelance writer and translator, sometimes things are busy and sometimes they are slow, but when they are busy I have to take advantage of the opportunity to earn a little bit of extra money. So, even though I have been cooking and photographing some delicious meals, I haven't spent very much time posting them on the blog. Fortunately (or unfortunately - depending on your point of view), things have slowed down a little bit lately so I have time to share a few more recipes. This is a beef with broccoli that I made sometime last month. It was just another step in my plan to become an expert chinese food chef, which hasn't really worked out very well for me so far. But I still really liked the meal and, interestingly, I felt like the leftovers were even better than the original dinner. I have the source recipe that I used, which I think might have come from about.com (sorry - it has been so long I just don't remember).

1 lb thin flank steaks, cut into strips

Marinade:
1 Tbsp rice vinegar
1 tsp sugar
1 tsp low-sodium soy sauce
1 Tbsp water
1 Tbsp cornstarch

Sauce:
2 Tbsp oyster sauce
2 Tbsp dark soy sauce
2 tsp minced garlic
1 Tbsp water

Other:
1 cup peanut oil
1 Tbsp cornstarch mixed with 1 Tbsp water

Combine the beef and marinade ingredients in a ziplock bag. Make sure that the beef is thoroughly coated and marinate for at least 30 minutes. If you marinate it for any longer than that, put it in the refrigerator. Prepare the sauce in a separate bowl and set aside. Steam the broccoli. Preheat the oil in a wok or large skillet on medium-high. When the oil is hot, add the beef. Cook, stirring occasionally, for 1-2 minutes, or until the beef is almost entirely cooked. Remove the beef from the wok and drain on paper towels. Pour excess oil out of the wok. If necessary, add 1-2 Tbsp more oil. Add broccoli and beef to the wok. Stir in sauce and the cornstarch mixture and continue stirring until it has thickened. Serve over rice.

Shredded Beef Flautas


Over the past few months, I have expanded my repertoire of Mexican cuisine considerably. Actually it all started when I ordered the "Mexican pack" from Bountiful Baskets at the end of August. It was really fun to make interesting foods that I hadn't ever tried before. Also, I have been surprised at how easy it is to make things like taquitos and chimichangas from scratch - for some reason it never occurred to me that I could make them at home rather than buying them in the freezer section at the grocery store - and I have to say that I highly recommend it. These flautas are very similar to taquitos. The main difference is that taquitos are wrapped in a corn tortilla and flautas are wrapped in a flour tortilla.

1 - 1 1/2 lb. chuck roast
1 cup beef broth
cumin
oregano
coriander
salt and pepper
4 cloves minced garlic
1/2 jalapeno, minced
1/2 onion, finely chopped
flour tortillas
cheddar cheese

You can bake this meat in the oven or in a slow cooker. If you do it in the oven, set the oven at about 325° and let it cook for 3-4 hours, checking occasionally. If the amount of liquid is low, add more broth. In a slow cooker, it should be cooked on high for at least 3-4 hours or on low for at least 6-8 hours. Once the meat is thoroughly cooked, use two forks to shred it. Add additional seasoning if necessary.

Preheat the oven to 375° and begin preparing the flautas. Place a small amount of cheese in the center of the tortilla. Top with shredded beef and roll the tortilla. Place each flauta seam-side down on a well-greased cookie sheet. Before baking them, brush oil over the top of each flauta (you can also use cooking spray). Bake for 8-10 minutes and then turn them over and bake for 5-6 more minutes or until golden brown. Serve with guacamole, sour cream, and salsa.


Friday, August 26, 2011

Strawberry Jello Cake


A few weeks ago, our church had a Jello festival. There was a Jello contest that I thought about entering, so I looked online for good recipes. I found this one on what I think was the official Jello recipe website. Unfortunately, by the time I selected this recipe, there wasn't enough time to go buy the ingredients and make it before the competition began. So I saved the recipe for later. I ended up making it for a Sunday dinner with my brother and sister-in-law and it was a huge hit! Although I adapted it somewhat, it is pretty much the same.

Crust:
2 1/2 cups vanilla wafer crumbs
10 Tbsp melted butter
6 tbsp granulated sugar

White layer:
12-16 strawberries, quartered
8 oz softened cream cheese
1 cup whipped cream
1 cup powdered sugar

Red layer:
8 oz pkg strawberry Jello (prepared according to Jello jiggler directions)

Combine crust ingredients and press into the bottom of a 9x13" pan. Chill 15 minutes. Meanwhile, bring water for Jello to a boil over medium-high heat. When it boils, stir in Jello powder until it is completely dissolved, then remove from heat. Leave the Jello in the pan while you are making and chilling the white layer. This will allow the Jello to cool somewhat and begin to thicken slightly. 

Proceed with the white layer by whipping the cream cheese with a hand mixer until it is smooth and creamy. Beat in the powdered sugar, then the whipped cream. Remove crust from refrigerator and spread strawberries over the entire crust. Top with the white layer. Chill for another 15 minutes.

Pour Jello over the white layer and return to the refrigerator. Allow it to set for approximately 3 hours before serving.


Friday, August 19, 2011

Freezer Fresh Green Beans


This past Saturday we also bought fresh green beans at the Farmer's Market. They gave us TONS of them and, after they sat in the refrigerator for a few days, I realized that we wouldn't be able to eat all of them before they started to get old and wrinkly. So before that happened I read up on how to preserve fresh green beans in the freezer. It is actually very easy. 

Green beans
boiling water
Ziploc bag

Rinse green beans and remove stems with scissors; cut to desired length. Heat water in a saucepan (or larger if you prefer) until it comes to a rolling boil. Blanche green beans for 2-3 minutes, then run them under cold water. Dry before placing in plastic bag or freezer container. Leave in freezer until you are ready to eat them.Vegetables can be stored at 0° for approximately 5-7 months.

Supposedly, blanching helps to retain the green color and fresh flavor. That is why it is important before you freeze most vegetables.